

How To Download Windows Xp Professional Work Group Or Computer Domain
How can I install Windows XP Pro on my figurer?
As a Microsoft Windows support professional, one of your tasks may be to install the operating system. This article provides a step-by-step tutorial on installing Windows XP Pro.
Windows Vista Update: We've recently added similar instructions for how to install Windows Vista
Pace #1: Program your installation
When you run the Windows XP Professional person Setup program, you must provide information almost how to install and configure the operating system. Thorough planning tin can make your installation of Windows XP Professional more efficient by helping you to avoid potential problems during installation. An agreement of the configuration options volition besides help to ensure that you have properly configured your organization.
I won't become into that role right now but here are some of the virtually important things you lot should take into consideration when planning for your XP installation:
- Check Arrangement Requirements
- Cheque Hardware and Software Compatibility
- Determine Disk Sectionalisation Options
- Cull the Appropriate File System: FAT, FAT32, NTFS
- Decide on a Workgroup or Domain Installation
- Consummate a Pre-Installation Checklist
After y'all made sure you lot tin proceed, start the installation process.
Step #2: Beginning the installation process
Y'all can install Windows XP in several methods – all are valid and good, it all depends upon your needs and your limitations.
- Transmission installations usually come in 3 flavors:
- Kicking from CD – No existing partition is required.
- Kick from the six Setup Kicking Disks, then insert the CD – No existing division is required (come across the Create Setup Kicking Disks for Windows XP page).
- Boot from an MS-DOS startup floppy, go to the command prompt, create a 4GB FAT32 partition with FDISK, reboot, format the C partition you've created, then get to the CD drive, become into the I386 binder, and run the WINNT.EXE command.
- Run an already installed OS, such as Windows NT iv.0 Server. From within NT 4.0 become to the I386 folder in the W2K installation CD and run the WINNT32.EXE command.
- If you lot want to upgrade a desktop OS such as Windows 98 into Windows 2000 Professional person you can follow the aforementioned procedure as higher up (You cannot upgrade Windows 98 into W2K Server).
There are other non-manual installation methods, such as using an unattended file along with a uniqueness database file, using Sysprep, using RIS or even running unattended installations from within the CD itself, merely we won't get into that right now.
Information technology doesn't matter how you lot run the setup process, simply the moment information technology runs – all setup methods await alike.
Step #3: The text-based portion of the Setup program
The setup process begins loading a blue-looking text screen (not GUI). In that phase you will exist asked to accept the EULA and choose a partition on which to install XP, and if that segmentation is new, you'll be asked to format it by using either FAT, FAT32 or NTFS.
- Start the reckoner from the CD.

- You lot can press F6 if you need to install additional SCSI adapters or other mass-storage devices. If you practise you will be asked to supply a floppy disk with the drivers and you CANNOT browse it (or a CD for that thing). Make sure you take 1 handy.

- If you want, you can press F2 to run the ASR sequence. For that y'all need a skillful backup created by the Windows XP fill-in program, and the ASR floppy disk. If you plan to install a new copy of XP – don't do annihilation.

- Setup will load all the needed files and drivers.

- Select To Setup Windows XP Professional At present. If you lot desire, and if you take a previous installation of XP, you can endeavor to set it by pressing R. If not, only press ENTER.

- Read and accept the licensing agreement and press F8 if you accept information technology.

- Select or create the partition on which you will install Windows XP Professional. Depending upon your existing disk configuration choose one of the following:
- If the hard disk is unpartitioned, you can create and size the segmentation on which you will install Windows XP Professional person.


- If the hard disk drive is already partitioned, only has enough unpartitioned disk space, you can create an boosted partitioning in the unpartitioned space.
- If the hard disk already has a partitioning that is large plenty, you lot can install Windows XP Professional on that segmentation. If the segmentation has an existing operating system, you lot will overwrite that operating organisation if you accept the default installation path. However, files other than the operating organisation files, such as program files and information files, will non be overwritten.
- If the hard disk drive has an existing partition, you can delete information technology to create more unpartitioned space for the new partition. Deleting an existing partition erases all data on that partition.
If y'all select a new partition during Setup, create and size simply the partition on which you will install Windows XP Professional. Afterward installation, utilise Deejay Management to sectionalization the remaining space on the hard deejay.
- Select a file system for the installation sectionalisation. Subsequently you create the sectionalisation on which you will install Windows XP Professional, y'all can use Setup to select the file system with which to format the partition. Windows XP Professional supports the NTFS file system in addition to the file allocation tabular array (Fat) and FAT32 file systems. Windows Server 2003, Windows XP Professional person, Windows 2000, and Windows NT are the only Microsoft operating systems that you can use to gain access to data on a local hard disk drive that is formatted with NTFS. If you plan to gain admission to files that are on a local Windows XP Professional partition with the Microsoft Windows 95 or Windows 98 operating systems, you should format the partition with a FAT or FAT32 file organisation. We will use NTFS.


- Setup will then brainstorm copying necessary files from the installation bespeak (CD, local I386 or network share).
- Note: If you began the installation process from an MS-DOS floppy, brand sure you have and run SMARTDRV from the floppy, otherwise the copying process will probably last more than an hour, possibly even more than. With SMARTDRV (or if setup was run past booting from CD) the copying will probably last a few minutes, no more than 5 max.


- The figurer will restart in graphical fashion, and the installation will go along.

Step #iv: The GUI-based portion of the Setup program
The setup process reboots and loads a GUI mode phase.


Information technology will and so begin to load device drivers based upon what it finds on your calculator. You don't need to do annihilation at this stage.

- Click Customize to change regional settings, if necessary.
- Current Organization Locale – Affects how programs display dates, times, currency, and numbers. Cull the locale that matches your location, for example, French (Canada).
- Current Keyboard Layout – Accommodates the special characters and symbols used in different languages. Your keyboard layout determines which characters announced when you press keys on the keyboard.
If you don't demand to make whatever changes merely press Next.
If you do need to make changes printing Customize and add together your System Locale etc.
Note for Hebrew users: Unlike W2K, it is Condom and information technology is OK for y'all to install Hebrew linguistic communication support at this phase.
To install Hebrew support:
Afterward pressing Customize go to the Languages tab and select the "Install files for complex script and right-to-left languages".

A alert message will appear. Printing Ok.
Alarm: You must now press Apply!!!
Setup volition copy the necessary files from the installation point.
You tin can now go to the Regional Options tab and select Israel in the Location driblet-down listing, and Hebrew in the Standards and Formats drib-down listing. Click Ok.
- Type your name and arrangement.

- Type the product key.

- Type the computer name and a password for the local Administrator business relationship. The local Administrator account resides in the SAM of the computer, non in Active Directory. If you will exist installing in a domain, you need either a pre-assigned estimator proper name for which a domain business relationship has been created, or the correct to create a computer account within the domain.
- Select the date, time, and fourth dimension zone settings.
- Setup will at present install the networking components.

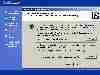
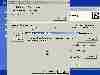
Later on a few seconds you volition receive the Networking Settings window. BTW, if you lot have a NIC that is not in the HCL (come across the What's the HCL? folio) and XP cannot discover information technology, or if you don't have a NIC at all, setup volition skip this stride and you volition immediately become to the final phase of the setup process.
Press Next to accept the Typical settings option if you have one of the following situations:
- Y'all have a functional DHCP on your network.
- You take a computer running Internet Connection Sharing (ICS).
- You're in a workgroup environment and do non plan to accept any other servers or Active Directory at all, and all other workgroup members are configured in the same manner.
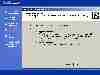
Otherwise select Custom Settings and press Next to customize your network settings.
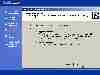
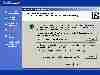
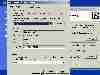
- 1 thing you Can do (you don't accept to do it, it's your call – read more than nearly it on the Increase Cyberspace Connection Speed in Windows XP page) is to uninstall the Qos Packet Scheduler. Click information technology and press the Uninstall button. If you desire to keep information technology you can simply remove the mark from the QoS check-box. In anyway you can subsequently install or uninstall it if you want.
Keep the TCP/IP, Client for Microsoft Networks and the File and Print Sharing options selected.
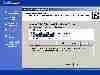
- Highlight the TCP/IP selection and press Properties.
In the General tab enter the required information. Yous must specify the IP address of the computer, and if you don't know what the Subnet Mask entry should exist – y'all tin merely place your mouse arrow over the empty area in the Subnet Mask box and click it. The OS will automatically select the value it thinks is adept for the IP address you provided.

If you lot don't know what these values mean, or if you lot don't know what to write in them, press cancel and select the Typical Settings option. You can easily change these values later.
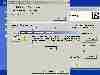
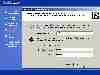
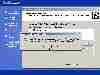
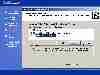
- In the Workgroup or Domain window enter the proper noun of your workgroup or domain.
- A workgroup is a pocket-sized group of computers on a network that enables users to work together and does non support centralized administration.
- A domain is a logical grouping of computers on a network that has a central security database for storing security information. Centralized security and assistants are important for computers in a domain because they enable an administrator to easily manage computers that are geographically distant from each other. A domain is administered as a unit with common rules and procedures. Each domain has a unique name, and each computer within a domain has a unique proper name.
If y'all're a stand-alone computer, or if you don't know what to enter, or if y'all don't have the sufficient rights to join a domain – leave the default entry selected and press Next.
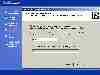
If y'all want to join a domain (NT four.0 domain of W2K/2003 Active Directory domain) enter the domain'due south name in the "Yes, make this computer a member of the following domain" box.
To successfully join a domain you need the following:
- The person performing the installation must have a user business relationship in Agile Directory. This business relationship does not demand to be the domain Ambassador account.
and
- The calculator must have an existing computer account in the Active Directory database of the domain that the computer is joining, and the computer must be named exactly every bit its domain business relationship is named.
or
- The person performing the installation must have appropriate permission to create a domain account for the computer during installation.
Also, y'all demand to have connectivity to the domain's domain controllers (only to the PDC if on an NT 4.0 domain) and a fully functional DNS server (only in AD domains). Read the Joining a Domain in Windows XP Pro and Requirements when Joining a Domain pages for more on this result.
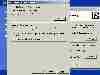
Enter the Active Directory domain name (in the form of xxx.yyy, for example: DPETRI.Cyberspace) or the NetBIOS proper noun of the NT 4.0 domain (in the class of xxx, for example: DPETRI). Printing Next.
Note: If you provide a wrong domain name or do not have the correct connectivity to the domain'southward DNS server you lot volition become an fault message.
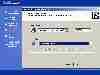
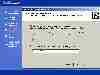
A username/countersign window volition appear. Enter the name and password of the domain'due south ambassador (or your own if yous're the administrator on the target domain).

Note: Providing a wrong username or password volition crusade this stage to fail.
- Next the setup process will finish copying files and configuring the setup. You do non need to do anything.


- Later the copying and configuring stage is finished, if XP finds that you lot have a badly configured screen resolution it will suggest you to change it and ask y'all if y'all see the new settings correct.


BTW, the minimum supported screen resolution in XP is 800X600.
- Setup finishes and boots Windows XP.

- A Welcome screen is the outset thing you see. The computer checks your Internet connectivity (required for the mandatory Activation and voluntary Registration processes).


You lot will be asked to register your copy of XP. Y'all can pass up if you desire.

- XP volition ask yous for the default username that volition log onto this reckoner. You can enter equally many as five users, but you tin can create more later on the installation is finished.
BTW, the Ambassador is not shown as a valid logon option (read more well-nigh it on the Add the Administrator'southward Business relationship to the Welcome Screen in XP Pro page).

- That's it! y'all're washed!


Now caput towards the Customize a New XP Installation page.

How To Download Windows Xp Professional Work Group Or Computer Domain,
Source: https://petri.com/install_windows_xp_pro/
Posted by: vernondaventure.blogspot.com
0 Response to "How To Download Windows Xp Professional Work Group Or Computer Domain"
Post a Comment